Resize Images Online Without Losing Quality (Free Tool and Guide)
Image Resizer
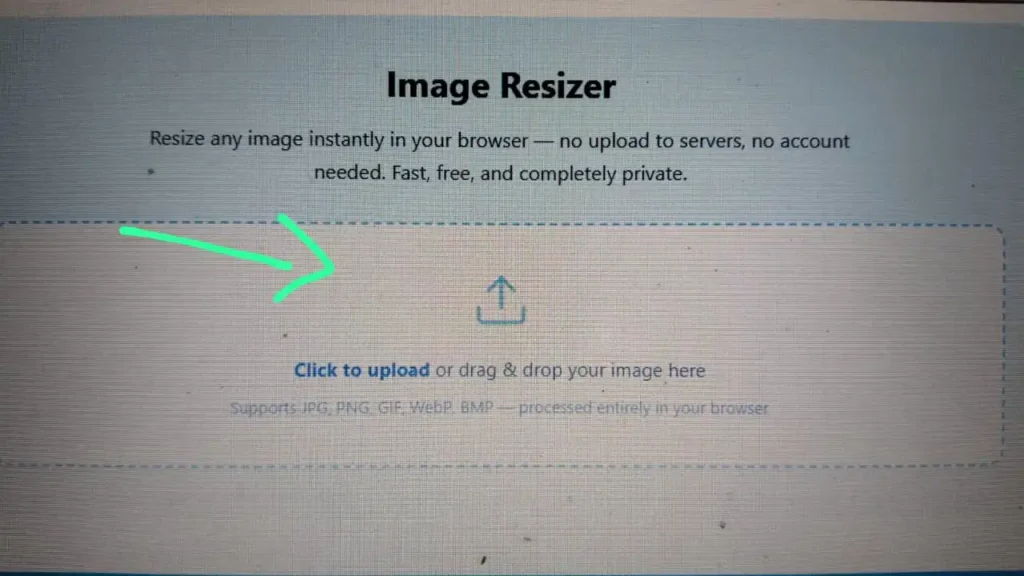
Resize any image instantly in your browser — no upload to servers, no account needed. Fast, free, and completely private.
Click to upload or drag & drop your image here
Supports JPG, PNG, GIF, WebP, BMP — processed entirely in your browser
Introduction: Why Image Resizing Matters
Have you ever tried uploading a photo, only to see the frustrating message: “Image too large”? I’ve been there many times. You just want to share a memory, post on social media, or upload a blog image—but file size limits seem impossible. Today, images appear everywhere—on websites, blogs, emails, online stores, and social media. Each platform enforces size limits, and beginners rarely anticipate these restrictions.
For example:
Large images not only block uploads—they also slow down websites. Slow-loading pages frustrate visitors and reduce engagement. Even Google highlights page speed as a key ranking factor. Most cameras and smartphones produce huge files, sometimes several megabytes. While great for storage, these files are impractical for online use. Image resizing solves this problem in seconds. You adjust dimensions, reduce file size, and maintain high-quality visuals.
I learned this while building websites. A few oversized images caused repeated upload failures. A simple resize made all my pages work perfectly. In this guide, you’ll learn how image resizing works, when it’s necessary, and how to do it quickly using our free online image resizer tool.
Free Online Image Resizer Tool
If you’re a beginner, you probably just want your image to upload without errors. That’s why our free online image resizer exists. It’s fast, easy, and requires no technical skills.
How It Works:
Why it works: I use this tool every day. Phone photos are often too large for blogs or social media. One quick resize solves the problem instantly, saving stress and time.
By removing the guesswork, the tool ensures your images are ready for any platform without reducing quality. It’s beginner-friendly and keeps your workflow smooth. Next, let’s clarify what an image resizer actually is, so you know exactly what happens when you resize an image.
What is an Image Resizer?
Many beginners confuse resizing with other actions like cropping or compressing. Understanding the difference is key to professional-looking images. An image resizer changes the width and height of your photo. Digital images consist of tiny squares called pixels. The number of pixels determines the image dimensions.
Aspect ratio matters. It’s the relationship between width and height. Resizing while keeping the aspect ratio locked ensures images don’t stretch or squash. Most tools, including ours, do this automatically.
Difference from Other Actions:
I learned the hard way: cropping accidentally changed my photo frame, while over-compressing made images blurry. Resizing simply adjusts dimensions, keeping content intact. Now that we understand resizing, let’s discuss why image size matters online.
Why Image Resizing is Important
Large images impact website performance, social media display, and file sharing. A single oversized image can slow a page and frustrate users.
Benefits of Resizing:
Social Media Examples:
Practical insight: Before I resized images properly, my pages loaded slowly. Users left before seeing content. Resizing improved speed, engagement, and SEO. Next, let’s see how to resize an image step by step.
How to Resize an Image (Step-by-Step)
Resizing seems intimidating, but it’s easy with the right tool. Follow these steps:
Step 1 — Upload Your Image
Select a file from your device. Supported formats: JPG, PNG, GIF, WEBP.
Step 2 — Choose Resize Method
Options include:
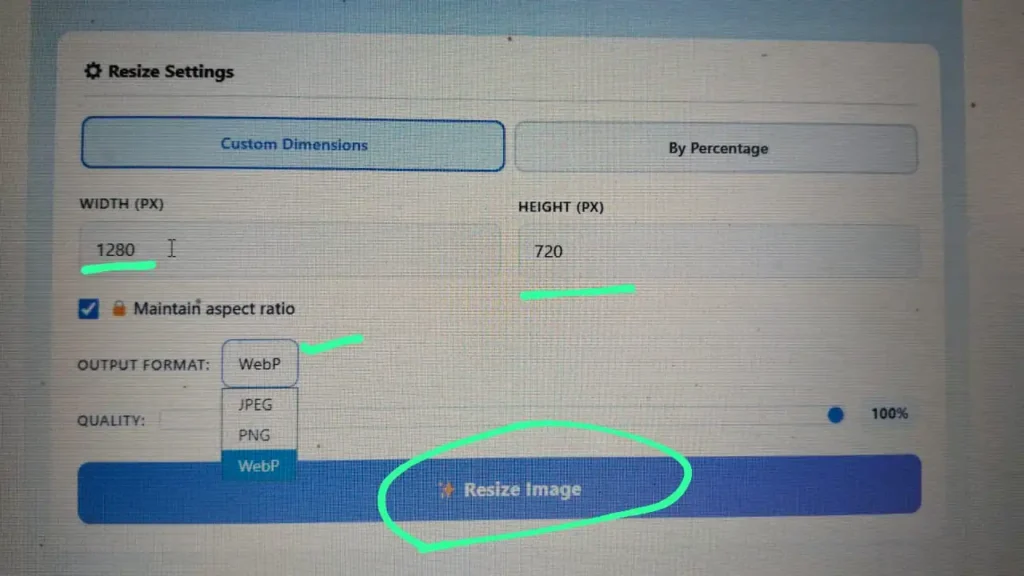
Step 3 — Adjust Width and Height
Enter new dimensions for your image. For example:
Step 4 — Maintain Aspect Ratio
Keep the ratio locked to prevent stretching. The image retains its natural shape.
Step 5 — Download Resized Image
Your new image is ready for web, email, or social media.
Practical insight: My first blog image took ten minutes to resize manually. With this tool, it’s done in seconds. Next, let’s explore different ways to resize images.
Different Ways to Resize an Image
Resize by Pixels
Directly set width and height in pixels. Perfect for websites and social media posts.
Example: 4000 × 3000 px → 1200 × 900 px
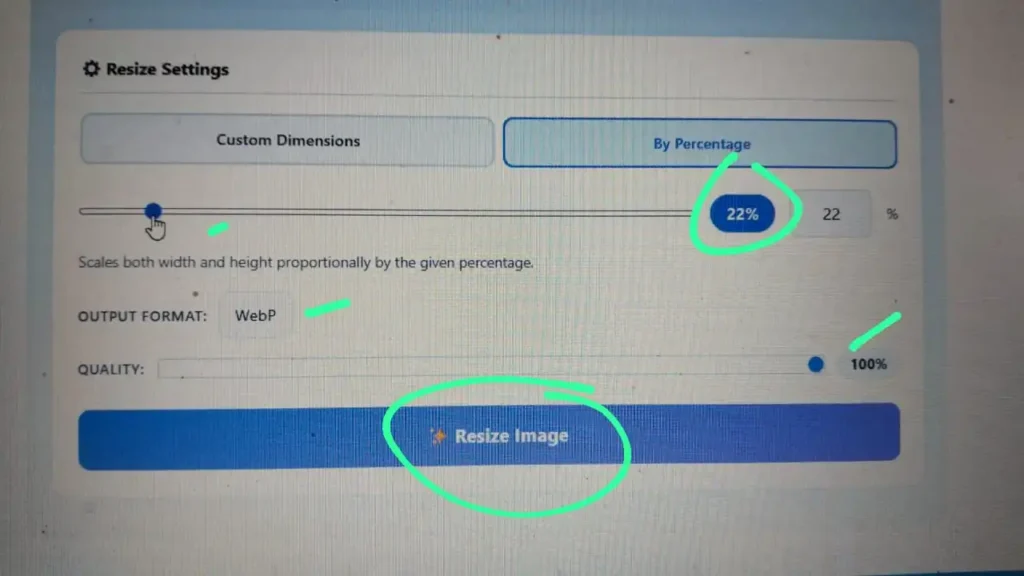
Resize by Percentage
Scale an image proportionally without calculating exact pixels.
Example: Reduce image to 50% of original size
Resize by File Size
Set a target size to meet upload restrictions.
Examples: 100KB, 200KB, 1MB
Practical insight: I often resize by file size for emails, by pixels for blogs, and by percentage for quick phone photos. Next, let’s cover how to resize without losing quality.
Resize Images Without Losing Quality
Nobody wants blurry photos. Following a few key steps keeps your images crisp:
Practical Tips:
I learned this when my resized blog images appeared fuzzy. Following these tips keeps photos professional and sharp. Next, let’s discuss image formats supported.
Image Formats Supported
Choosing the right format affects image quality and file size:

I use: JPG for photos, PNG for logos, WebP for web, GIF for small animations. Proper format selection improves speed and clarity. Next, let’s see social media image sizes.
Image Sizes for Social Media
Different platforms display images differently. Upload the wrong size, and images may appear blurry, cropped, or distorted.
Recommended Sizes:
Insight: Following these ensures professional-looking posts. I always check sizes before posting. Next, let’s learn common image resizing mistakes.
Common Image Resizing Mistakes
Practical insight: I made these mistakes early on. Avoiding them keeps your visuals professional and crisp. Next, let’s clarify resizer vs compressor.
Image Resizer vs Image Compressor
Image Resizer
Image Compressor
When to use each: Resize for dimension requirements. Compress when file size matters.
Insight: I usually resize first, then compress to preserve clarity. Next, let’s cover advanced optimization tips.
Advanced Image Optimization Tips
These steps improve speed, sharing, and user experience. I apply them daily for blogs, social media, and email. Next, let’s see best tools for image resizing.
Best Image Resizer Tools
When to use: Multiple images, special formats, adding text or logos, professional publishing. Next, a personal insight from my experience.
Personal Insight
Most people upload images far larger than needed. A 5MB photo often works fine at 200KB.
Lessons learned:
Next, I’ll share my practical 4-step framework.
Practical Framework for Image Resizing
The 4-Step Smart Resize Method:
This framework simplifies resizing and ensures professional results every time.
Quick Beginner Checklist About Image Resizer
✔ Resize dimensions
✔ Maintain aspect ratio
✔ Use correct format
✔ Keep file size small
✔ Check clarity
Following this checklist ensures smooth uploads and professional visuals.
Frequently Asked Questions About Image Resizer
Final Thoughts about Image Resizer
Image resizing seems small but matters for blogs, websites, and social sharing. Properly sized images:
Use the free online image resizer below. In seconds, your images will upload smoothly and look professional. Small adjustments save frustration, time, and make visuals stand out.
Before using our tool, you may want to read our important pages: About Us, Privacy Policy, Terms & Conditions, and Contact Us.